DIDs
DIDs are used to point all incoming calls (that come over trunks) to specific system destinations.

- DID/Channel: DID number or a PSTN channel slot number. (E.g. 00201200103)
- Provider: Provider name. (E.g. Generic SIP)
- Trunk: Trunk used by a DID. (E.g. Trunk1)
- Destination: Trunk destination and destination network number. (E.g. Extension – 5000)
- Status: DID status. (E.g. Active/Inactive)
- Edit (Click to edit the DID configuration)
Edit DID
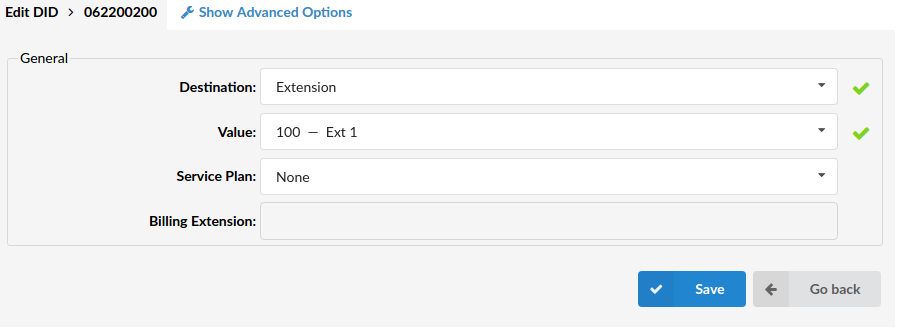
General
- Destination Steadfast-UC destination to which DID will transfer all calls. (E.g. Extensions)
- Value: Destination value to which all DID calls will be transferred. (E.g. If ‘Destination’=’Extension’, set the extension number here(e.g. 1002). In case ‘Destination’=’IVR’, set the IVR extension number here)
TIP: If using ‘Fax to E-mail’ as ‘Destination’, set the ‘Value’ field to an email address (email@domain.com) or extension number (1002). If an extension number is used, the fax will go to the email address associated with the extension. The email which arrives to the specified address will contain both TIFF and PDF versions of the FAX
- Service Plan: This option is used so you can bill inbound calls to IVRs, Conferences, Queues, and Voicemail. If these are selected as Destination, they will be billed as ‘Local destinations’ from Service Plan.
- If Extension/Multi-User is selected, call will be billed as per incoming price set for E.164 number in DID. Balance on Extension could be set as + or – value so you can decrease or increase balance for that extension when it receives the call.
- For other Destination Types Service Plan is disabled. (E.g. National Service Plan)
- Call Rating Extension: Extension which is charged for inbound call rating set on DID. (E.g. 1005)
Advanced Options
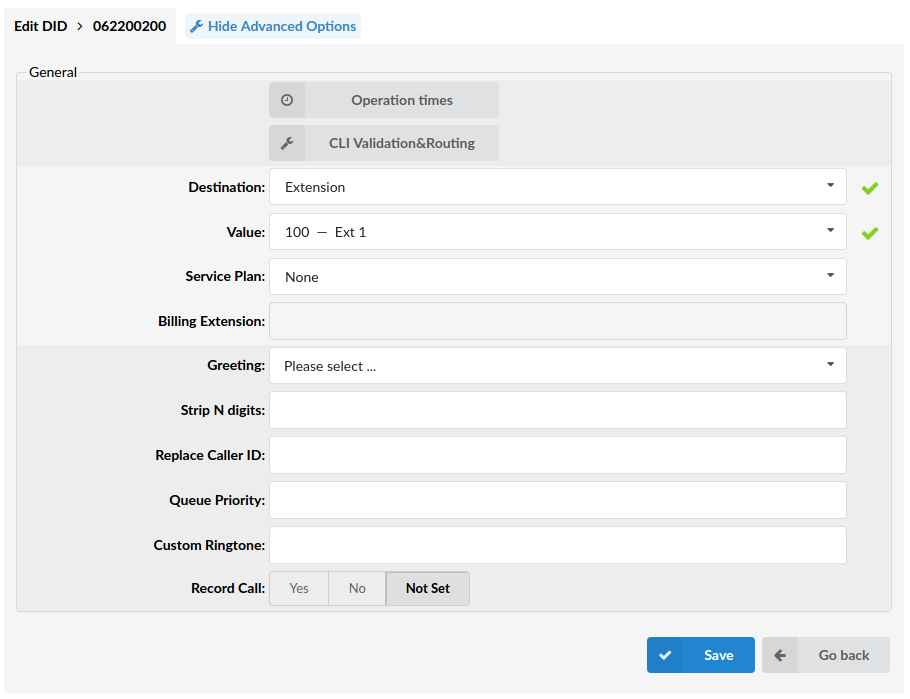
General
- Operation Times: Set the DID operation time
- CLI Validation & Routing: Configure Validation & Routing
- Greeting: Greeting which is played when calling this DID. When uploading a greeting for DID, the name of the sound file must start with ‘greeting-did-‘
- Strip N digits: Here you can set the number of digits which will be stripped from the beginning of the incoming call. (E.g. 3) ([0-9])
- Replace Caller ID: Replaces the caller id with the custom data provided here. This is used when you want all incoming DID calls to have this value displayed as a caller id information. Along with the custom data, you can use the ‘%CALLERID%’ variable, which displays the calling party phone number.
- NOTE: Please make sure you enter this information as it is written down, otherwise, it will not work properly. (E.g. Providing a ‘USDID’ here, will display ‘USDID’ on your phone display, for all calls coming through this DID. Providing ‘USDID %CALLERID%’, will display ‘USDID 55510205’ on your phone display, where 55510205 is calling party phone number).
- Queue Priority: Set the Queue priority. (E.g. If this DID redirects all calls to the queue, set ‘1’ here to give all calls over this trunk the highest queue priority). ([a-z][0-9])
- Custom Ringtone: If you are directing calls to an extension on which a supported UAD is registered, you could set a Custom Ringtone with which the phone will ring. (E.g. <Simple-3>) ([a-z][0-9]
- Record Call: If this option is turned on the incoming call on this DID will be recorded. When this option is turned on, a complete call will be recorded, whenever it goes or whatever happens to it
- Notify on Not Answer: If set to ‘Yes’ – any calls that are not answered on this DID will be logged for the next notification e-mail.
Operation Times
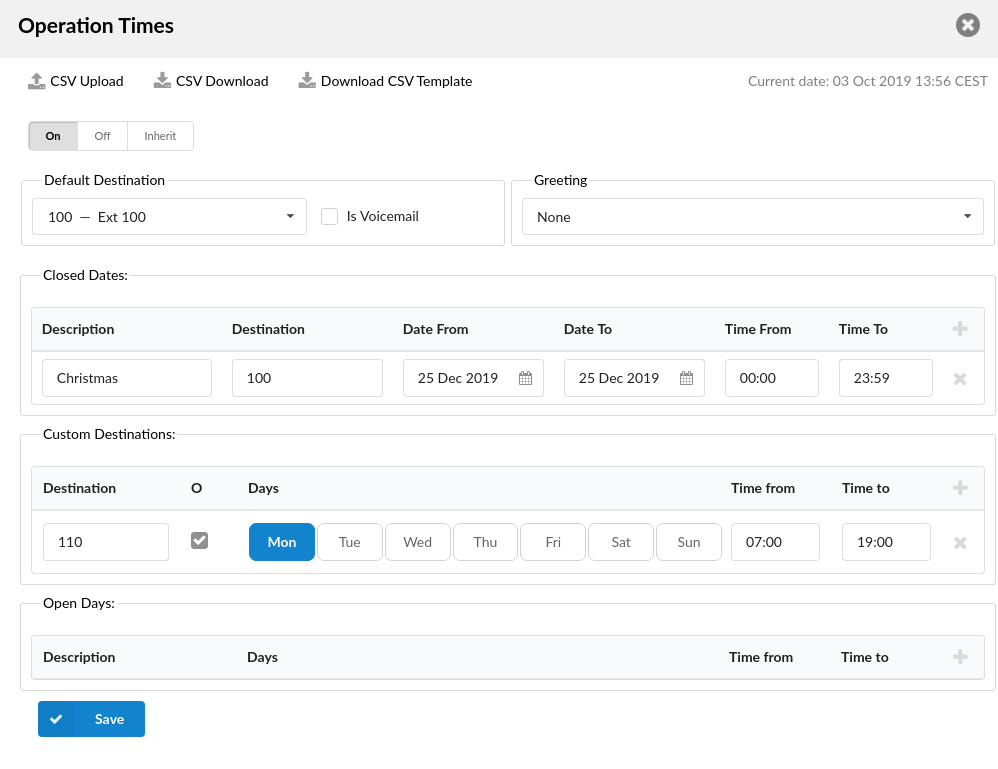
Set the system open/closed times. Depending on the time when the call is received, the call can be redirected to different destinations.
- CSV Upload: Click on this button to upload Operation Times configuration from csv file
- CSV Download: Click on this button to download Operation Times configuration to csv file
- Download CSV Template: Download CSV Template button will present you with a file that already contains necessary headers which should help you create CSV file easier
- Enable operation times: Enable operation times. (E.g. Yes, No, Inherit)
Default Destination
- Default Destination: Steadfast-UC extension to which all calls are redirected during the closed time hours. (E.g. 1000) ([0-9])
- Is Voicemail: Choose if Default Destination is voicemail
Greeting
- Greeting: Greeting sound file played to callers during the closed times. (E.g. greeting-***)
Options
- Closed dates Sets the specific date/s when all calls are redirected to the ‘Default Destination’. If the ‘Destination’ field in the Closed dates is set, calls will not go to the ‘Default Destination’ but to this number.
- Custom Destinations: Redirects all calls received during non-working hours (e.g. weekend) to the Steadfast-UC extension provided here.
- Open dates: Sets the working hours during which the DID is to redirect calls as set in the DID Add/Edit window. If any call is received during the hours not set here the call is redirected to ‘Default Destination’.
CLI Validation & Routing
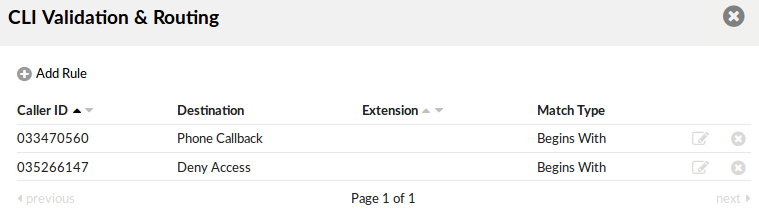
This option is used to fine tune the functionality of the DID by adding rules which send the calls to different destinations based on Caller IDs. For example, if the caller’s ID begins with 203, you can send all those calls to the IVR, if the CallerID is specifically number 063456789 then send that call to extension 4444 etc…
Once you click on CLI Validation & Routing button on Edit DID page, new window with following option will be shown:
- CSV Upload: Click on this button to upload CLI Validation & Routing configuration from csv file
- CSV Download: Click on this button to download CLI Validation & Routing configuration to csv file
- Download CSV Template: Download CSV Template button will present you with a file that already contains necessary headers which should help you create CSV file easier
- Caller ID: The Caller ID which is matched in the rule. (E.g. 063456789)
- Destination: The type of destination to which the call will be directed. (E.g. IVR)
- Extension: Extension of the destination or selection where the call should go. (E.g. 2222)
- Match Type: How the Caller ID is matched. (E.g. If we set Match explicitly to ‘yes’ here will be written ‘Explicit Match’. If we set this option to ‘No’ or ‘Not Set’ here will be written ‘Begins With’.)
- Edit (Edits the CLI Validation & Routing configuration)
- Delete (Deletes CLI Validation & Routing Rule from the system)
Add/Edit CLI Validation & Routing Rule
- Caller ID: The Caller ID which is matched in the rule. (E.g. 063456789) ([a-z][0-9])
- Destination: The type of destination to which the call will be directed. (E.g. Queue)
- Extension: Value of the destination or selection where the call should go.
- Match Explicitly Is Caller ID going to be matchet ‘explicitly’ or with ‘begins with’. (E.g. Yes, No, Not Set)
Add DID
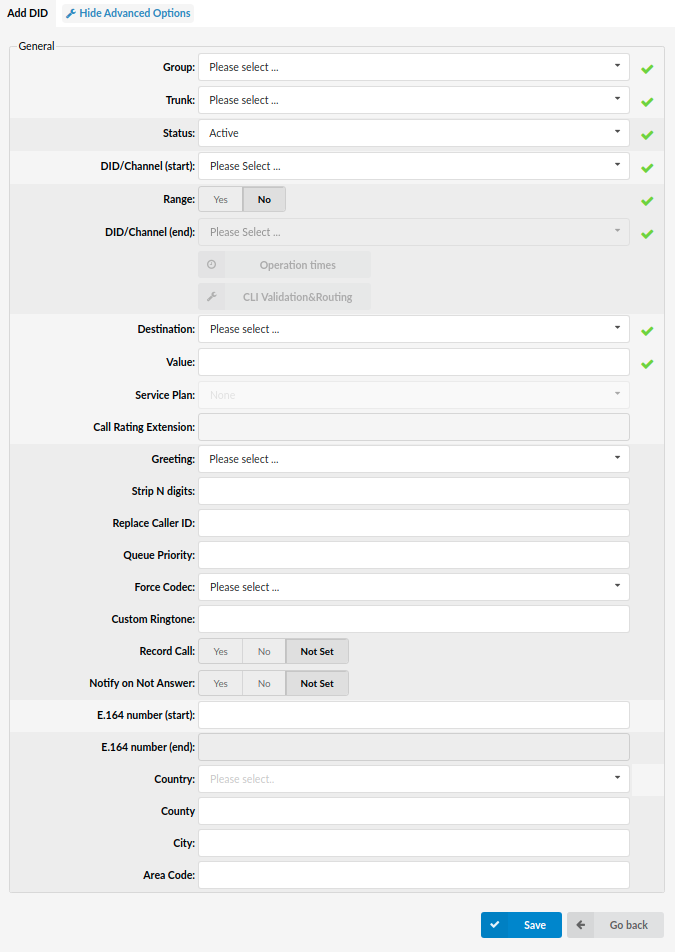
When DID Groups mode is active, DIDs creation is available. Fields are almost the same as for creating on Master Tenant. The only difference is that instead of ‘Tenant’ field you have ‘Group’ field.
The following things have changed:
- After you have chosen a group, the DID/Channel field will be changed to a drop-down, depending on some rules (written below)
- The drop-down will be used as an autocomplete feature and will show available DIDs from the chosen group.
- Maximum of 10 DID numbers are shown at a time so in order to narrow your choice you need to type in more characters.
- The drop-down will only show the available DIDs, meaning that those already reserved/created will not be shown.