Click to expand
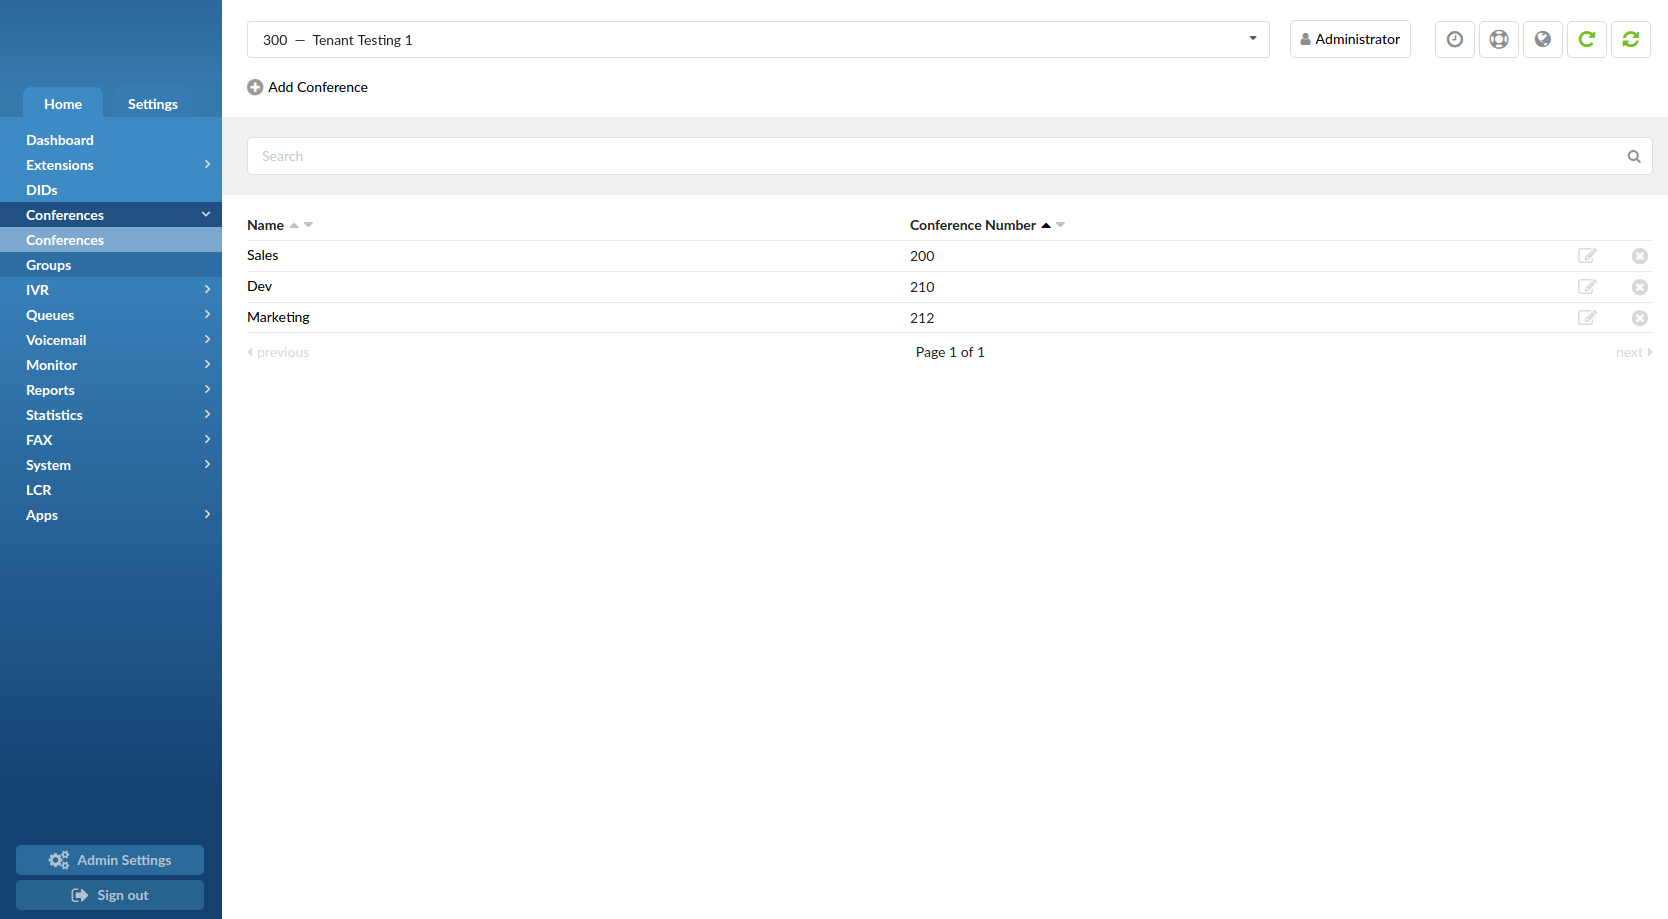
Conferences allow two or more participants to communicate with each other at the same time using voice, video, or both. Default limit for active conference members in Steadfast-UC is 256 users in all conferences, meaning that you can have a single or multiple conferences but their total active users count cannot exceed 256 across all active conferences.
This screen lists all system conferences with the following details
- Name: Conference name: (ex. Sales, Development)
- Conference Number: Conference system or network number for users to dial (ex. 2255)
 Edit (Edits the Conferences configuration.
![]() Delete (Deletes a Conference from the system)
Delete (Deletes a Conference from the system)
Search

Click to Expand
By selecting the ‘Search’ Command, the search menu will be displayed. Searches can be done by Name and Number.
- Search: Search phrase. (ex. Provide a search phrase here and hit enter to filter the records). ([a-z][0-9])
- Name: Should the search filter be applied to conference names. (ex. Check the box to search conference names).
- Number: Should the search filter be applied to conference numbers. (ex. Check the box to search conference numbers).
Add Conference

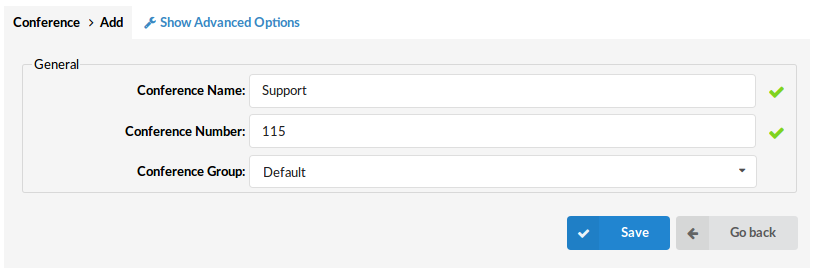
Clicking on the ‘Add Conference’ button will allow you to add a new conference.
- Conference Name: Unique Conference identifier/name, this name will be displayed once the ‘Conferences’ menu is selected. (ex. Main) ([a-z][0-9])
- Conference Number: Unique Conference Steadfast-UC number, this number is to be dialed in order to access the conference. (ex. 106) ([0-9])
- Conference Group: Here you can select a conference group that you have made before. In this group you can define users permissions and conference options. (ex. Staff)
Advanced Options
Click on the ‘Advanced Options’ button to open more detailed conference options.
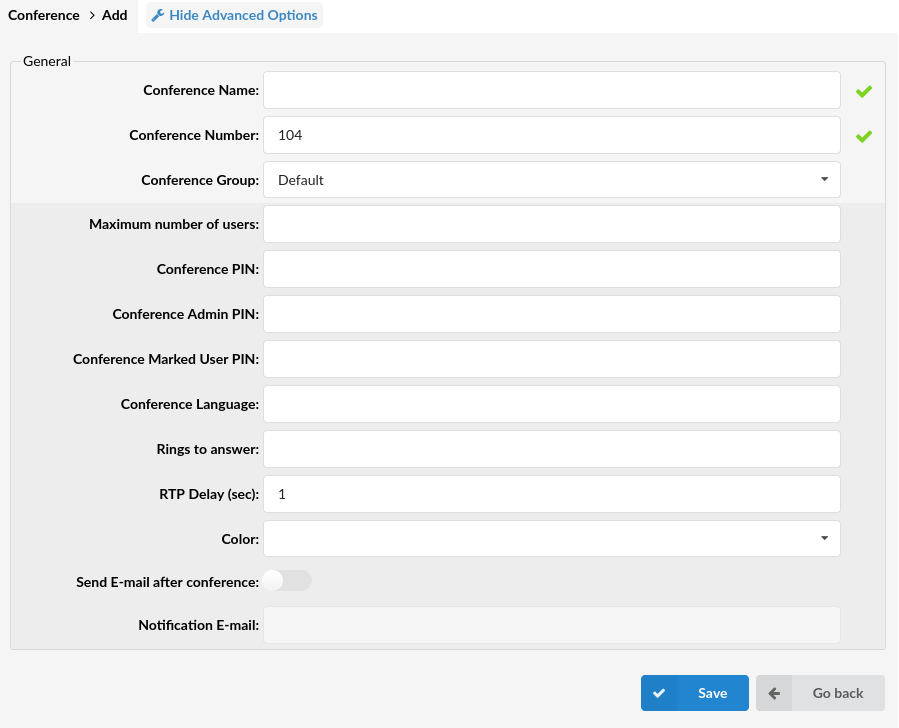
- Maximum number of users: This is the maximum number of users permitted in the Conference. (ex. 10)([0-9]
- Conference PIN: Conference PIN number. If set, this PIN will have to be provided by all callers before entering the Conference.
- (ex. John dials the sales conference (1001), but this conference has this field set to 9576. John is asked to provide the conference PIN. If a valid PIN is provided, John will enter the conference, or his call will be rejected after 3 invalid PIN entries). ([0-9])
- Conference Admin PIN: When users enter the Admin PIN, they dynamically gain administrative rights for the conference that they are dialing into.
- (ex. John is the operator, but he needs to enter the conference as an admin. Since he does not have admin privileges set, when entering the conference he will use an admin PIN to dynamically gain those privileges). ([0-9])
- Conference Marked User PIN:When users enter the Marked PIN, they dynamically gain marked user rights for the conference that they are dialing into.
- (ex. John is the operator, but he needs to enter the conference as a Marked user. Since he does not have Marked user privileges, when entering the conference he will use a Marked user PIN code to dynamically gain those privileges). ([0-9])
- Conference Language: Set the language used for announcements to the conference. Default is English.
- Rings to answer: Number of rings played to the caller before a call is allowed to enter the Conference.
- (ex. Rather than just ‘falling’ into the Conference, it is recommended to set the number of ring sounds played to the caller). ([0-9])
- RTP Delay [sec]: Delay time in seconds inserted before the conference operator answers. This delay solves the ‘half-played’ greeting file problem. Keep this value set between 1-3 for optimal performance.
- NOTE: The ‘half-played’ greeting file problem usually exists on VOIP trunks.
- (ex. John enters the sales conference (1001) and hears ‘… currently the only user in this conference’ message. This message is only partial and can confuse conference members. Set this field to 1 (or higher, depending on how much is not heard) to play the message in full length.) ([0-9])
- Conference color: Determines which color will be used for this conference in Steadfast-UC Systems Communicator. (ex. Black)
- Send E-mail after conference: After the conference ends, an email containing the sound file can be sent to the predefined email address. (toggle ON and OFF)
- Notification Email: Enter the email address which will receive the conference sound file after the conference has ended.NOTE: These two options have no effect if the “Record Conference” option is not selected in the conference group for that conference
Groups
Conference Groups are used to create groups of users that have certain permissions for conferences.

- Group Name: Name of the conference group. (ex. Staff)
- Users: User Extensions that are added to this group. (ex. 101, 108, 109)
- Edits the Conference Group configuration .(ex. click to edit the Conference Group configuration)
 Deletes a Conference Group from the system. (ex. Click to delete a Conference Group from the system)
When you click on the ‘Add Conference’ Group button, you will be able to add a new Conference Group.
General
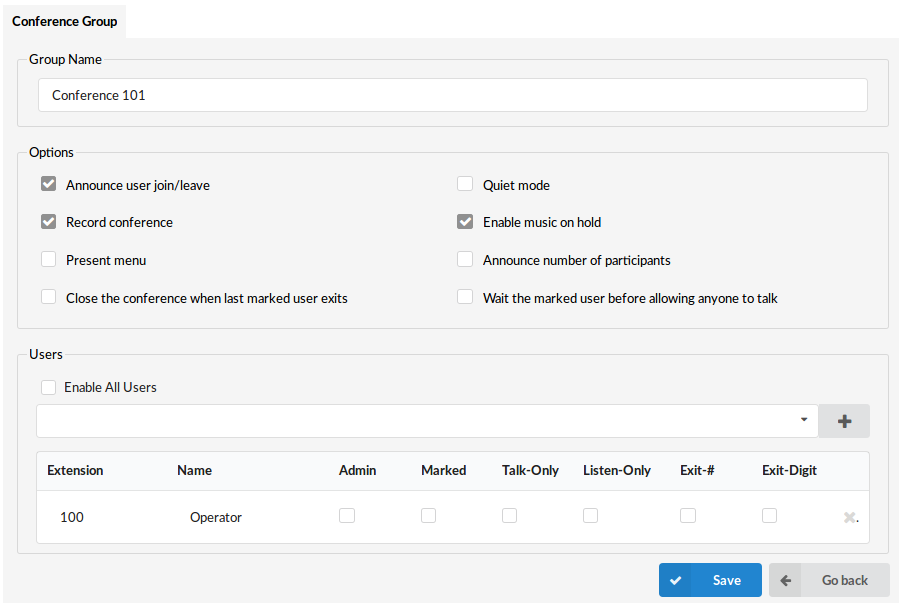
- Group Name: Unique Conference Group name. (ex. Staff) ([a-z][0-9])
Options
- Announce user join/leave w/review: If this option is checked/enabled, all new conference members will be asked to say their name and press the ‘#’ key before they enter the conference. After a user presses the ‘#’ key, they will be presented with the following menu:
-
- 1 – press 1 to accept your name and enter the conference
- 2 – press 2 to listen to your name
- 3 – press 3 to re-record your name
This name will be recorded and played to other conference members when a caller joins/leaves the conference.
- (ex. John dials the 1001 sales conference and is asked to say his name and to press the ‘#’ key. Of course, he says ‘John’ and presses the ‘#’ key. After that he is presented with a menu where he chooses to accept his name and enter the conference. At the same time, all conference members will hear ‘John has entered the conference’. When John leaves, all conference members will hear ‘John has left the conference’ message).
- Announce user join/leave: If this option is checked/enabled, an announcement will be played when a user joins or leaves a conference.
- (ex. If John dials the 1001 sales conference, he is asked to say his name and to press the ‘#’ key. He says ‘John’ and presses the ‘#’ key. At the same time, all conference members will hear ‘John has entered the conference’. When John leaves, all conference members will hear ‘John has left the conference’ message).
- Quiet mode: If this option is checked/enabled, conference members will not hear the enter and leave sound. (ex. Check this option if you do not want to hear the join/leave sound).
- Record conference: This option will record the conference so you can download the record file.
- NOTE: You can download the recorded file in Conferences: CDR’s, by selecting a conference and clicking on the Listen button. (ex. Yes)
- Enable music on hold: Enable MOH (Music On Hold) if there is a single member in a conference. Enable this feature to play MOH music files until someone else joins the conference.
- (ex. If John enters the conference first, and he is the only one there, he will hear MOH. Enable this feature to play MOH music files until someone else joins the conference).
- Present menu: Plays Conference options once * is dialed while in a conference.
- (ex. John enters the sales conference and dials ‘*’, Conference options are played back (e.g. ‘Please press 1 to mute/un-mute yourself’)).
- Announce the number of participants: Announces the number of conference participants to a new conference member. “There is currently only 1 other participant in the conference.”
- (ex. The Sales conference has this option enabled and is currently empty. John enters the conference and hears ‘You are currently the only person in this conference’ played back to him).
- Close the conference when the last marked user exits: Closes the conference once the last marked user exits, no matter how many participants are still active in the conference conversation, their calls are immediately dropped.
- (ex. John (marked user) enters the sales conference. This conference has this option enabled and there are 3 other members participating in the conference. As soon as John leaves the conference, all other conference members will have their calls dropped and will no longer be able to talk to each other).
- Wait for the marked user before allowing anyone to talk: Disables the conference until the marked user enters the conference.
- (ex. This option is enabled for the sales conference. There are 3 members waiting for John (marked user) to enter the conference. These 3 members will hear nothing and will not be able to talk to each other until John enters the sales conference).
Users
![]()
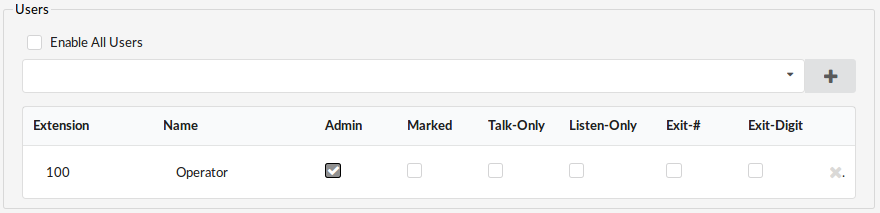
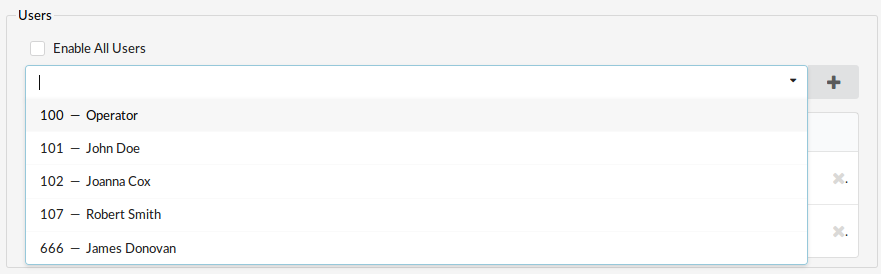
There are two options for enabling users to join a specific conference room. You can either enable all users by selecting the check box for Enable All Users or you can manually add users by clicking the + sign in the upper right corner of the Users table. This will open the Conference Groups: Add User pop-up window where you can perform a search by the Extension number, Name, or e-mail address. After your search results are displayed, simply click on the user that you want to add to the Users table.
- Enable All Users: With this option you can allow all users to enter a conference.
- Extension: The extension number of the user that you have added to the group. (ex. 233)
- Name: The name of the user that you have added to the group. (ex. John Crichton)
- Admin: Sets the admin conference mode. If this option is enabled, conference calls coming from the extension will be treated with admin privileges. (ex. No)
- Marked: Sets the marked conference mode. If this option is enabled, conference calls coming from the extension will be given less privileges than admin, but more than regular conference participants. (ex. No)
- Talk-Only Sets the ‘talk only’ conference mode. If this option is enabled, conference calls coming from this extension will be allowed to talk only (no voice will be heard on the UAD/Phone). (ex. No)
- Listen-Only: Sets the listen only conference mode. If this option is enabled, conference calls coming from the extension will be allowed to listen only (no voice will be sent from the UAD/Phone). (ex. No)
- Exit-#: If this option is enabled, users will be allowed to exit the conference by dialing the ‘#’ key. (ex. No)
- Exit-Digit: If this option is enabled, users will be allowed to exit the conference by dialing any digit. (ex. No
CDRs

CDR displays detailed records of all Steadfast-UC calls in the conferences with the following details.
- Conference: Name of the conference. (ex. Tech Discussion)
- Start: Date and Time when the conference began (ex. 04 Oct 2006 10:44:10)
- Duration:Conference duration time in hh:mm:ss format (ex. 00:12:45)
- Participants: Number of users inside the conference (ex. 10)
 This icon is displayed once a call is recorded and ‘Delete’ or ‘Listen’ enhanced service is active.
 This is a box used with the CDR commands to select a desired call.
Search/Filter
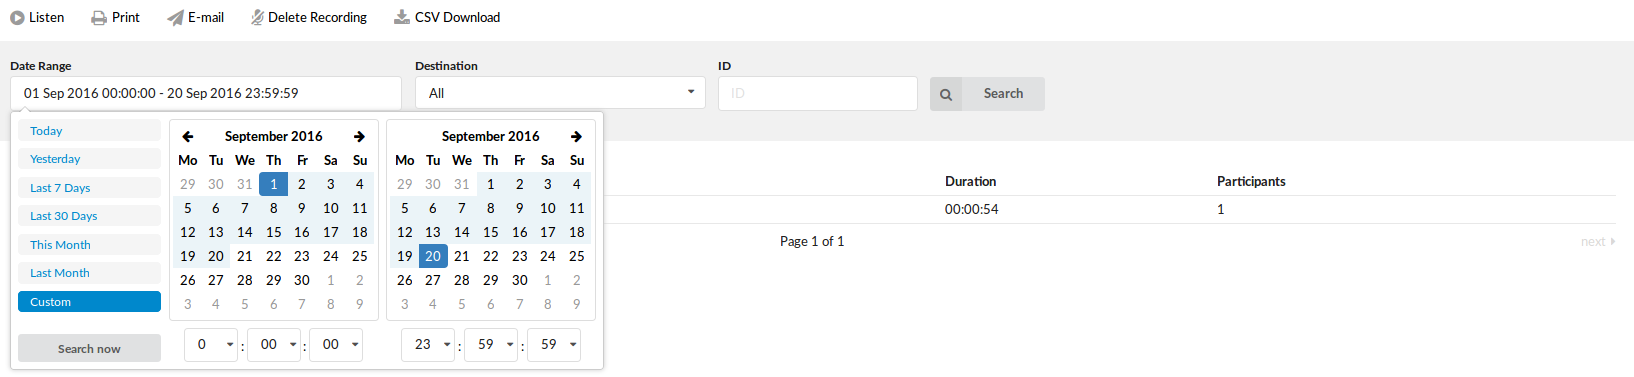
- Start Date: Select a Search/Filter start date. (ex. Click on the small ‘Calendar’ icon next to a field and select the desired date).
- End Date: Select a Search/Filter end date. (ex. Click on the small ‘Calendar’ icon next to a field and select the desired date).
- ID: ID of the CDR. When the user selects a CDR, the ID field shows that CDR’s ID. If there are problems on the system, the customer can give the support team the problematic CDR ID which helps in locating it. (ex. 1221045103.66) ([0-9] .)
- Start Time: When searching for CDRs, this is the start time in the Start Date. (ex. Time in hh:mm:ss format like 10:15:30) ([0-9] 🙂
- End Time: When searching for CDRs, this is the end time in the End Date. (ex. Time in hh:mm:ss format like 15:20:30) ([0-9] 🙂
- Destination:Search conferences based on the number of conference typed in this field.(E.g. 1006)([0-9])
Actions
Listen
- Listen: Once the “Listen” icon is displayed next to a conference record, it means that the specific conference was recorded. To play the recorded conference, check the box next to the “Listen” icon and click “Listen”. The browser will prompt you to open the sound file in your audio player or to download the sound file.
- TIP: By default the sound format is available as a .gsm file. To change the recording format go to “Settings -> Tenants -> Call Recordings -> Recordings format” and select one of the available sound formats:
- gsm
- wav
- wav49
- ogg

Click on the “Print” button to open a new pop-up window with the printing interface.

Enter e-mail address dialog
Click on the “E-mail” button to send all reports listed on the page.
Provide the e-mail address where the report should be sent and click the “OK” button to proceed or “Cancel” to abort the email action.

Confirmation dialog: Press “OK” to email all CDR records on the current page (even if they are not selected) or click “Cancel” to print the selected records only.
Finally, press the “OK” button to confirm the email action or “Cancel” to abort the email action.
- Delete Recording: Deletes the recorded conferences.
- Download CSV: Download data as the .csv (Comma Separated Value) file. (E.g. Click this button to download the .csv file to your desktop).