Steadfast-UC Queue system for Contact Center allows you to receive more calls in your Steadfast-UC than your staff members are able to answer at the same time.
They will enable you to deal with your calls more efficiently and your customers will be held in a queue, listening music on hold and receiving information messages about a proximate wait time and/or their position in queue.
Queues consist of:
- Incoming calls being placed in the queue
- Members that answer the queue (extensions or users that login as agents)
- A strategy for how to handle the queue and divide calls between members
- Music played while waiting in the queue
- Announcements for members and callers
NOTE: Mobile applications and queue calls (5.3 update)
- If there is a mobile application registered on an extension in the queue, when a call is received from the queue mobile applications will not be woken up via the push service.
Queues
This screen lists all system queues with the following details:

- Name: Queue name. (E.g. Patience)
- Number: Queue network number
(E.g. 1001)
(Display) - Strategy:Queue strategy
(E.g. ringall)
(Display) - Agents
Number of queue members
(E.g. 5)
(Display)
 Edits the queue configuration (E.g. Click to edit queue configuration)
(Button)
 Deletes a queue from the system
(E.g. Click to delete a queue from the system)
(Button)- Monitor Queue icon – Monitor queue
(E.g. Click to monitor queue)
(Button)Search
Search is by default performed by Name and Number
- Search:
Search phrase
(E.g. Provide a search phrase here and hit enter to filter the records)
([a-z][0-9])
Monitor Queues
 Clicking on the Monitor Queues button will popup frame with the list of all available queues and general information about each queue.
- Here you can also search by a single queue or select multiple queues to keep track of.
- Refresh
Select your preference in the drop-down menu in regards to how often you would like the page to be refreshed.(E.g. Select ’10 sec’ in this field, for example, to automatically refresh data every 10 seconds)
(Select box)
- SearchEnter the name(s) of the queue(s) you would like to monitor on the page.
(E.g. Sales, Support)
(Multi select)
Selecting a single queue to monitor brings up a new window with more information about the current queue calls.
Overview
- The Overview section basically provides a historical data for a given day and will reset at midnight (it also refreshes every 10 secs by default).
(E.g. Entered 50, Connected 35, Abandoned 15)
(Display)
Callers
- Real time data about callers in queue
(E.g. Total 20, Connected 17, Waiting 3)
(Display)
Agents
- Real time data about agents in queue
(E.g. Total 7, Logged in 5, Paused 2)
(Display)
Extensions
- Real time data about static members
(E.g. Total 5, Online 3)
(Display)
Settings icon
Option to show/hide detailed information about Agents/Extensions/Callers
(E.g. Show Agents, Hide Extensions, Show Callers)
(Sliders)
Agents
- This section shows real time data about agents with following details:
Number
Agent number
(E.g. 1001)
(Display)
- Name
- Agent name
(E.g. John Doe)
(Display)
- Extension
- Extension to which agent is logged in
(E.g. 1500)
(Display)
- State
- Agent state
(E.g. IDLE)
(Display)
- Caller
Caller ID
(E.g. Jane Doe (1000))
(Display)
- Status
- Agent status
(E.g. LOGGED IN)
(Display)
- Login Time
- Agent login time
(E.g. 05:10:30)
(Display)
- Monitor
 Listen to active conversation. When you click on this button you will be prompted to select which extension will monitor selected call.
- (E.g. Let’s say queue agent 1001 is on call with caller Jane Doe (1000). Click on this button and type 1005 into the pop-up window. Extension 1005 will ring and once the handset is picked up, the conversation between Jane Doe (1000) and agent 1001 will be heard)
- (Button)
- Transfer
 Transfer a party from the active conversation to a different destination. When you click on this button you will be prompted to select destination to which call will be transferred.
- (E.g. Let’s say queue agent 1001 is on call with caller Jane Doe (1000). Click on this button and type 1005 into the pop-up window. Caller Jane Doe (1000) will be transferred to extension 1005)
- (Button)
- Hangup
 Hang up the active conversation. When you click on this button you will be prompted to confirm you want to hang up selected call.
- (E.g. Let’s say queue agent 1001 is on call with caller Jane Doe (1000). Click on this button and confirm you want to hang up selected call. The conversation between caller Jane Doe (1000) and agent 1001 will be terminated).
- (Button)
Extensions
- This section shows real time data about SIP members with following details:
- Number
- Member number
(E.g. 1500)
(Display)
- Name
- Agent name
(E.g. John Doe)
(Display)
- Extension
- Extension
(E.g. 1500)
(Display)
- State
- Agent state
(E.g. IDLE)
(Display)
- Online
- Time how long extension is online
(E.g. 00:50:30)
(Display)
- Monitor

- Listen to active conversation. When you click on this button you will be prompted to select which extension will monitor selected call.
(E.g. Let’s say queue SIP member 1500 is on call with caller Jane Doe (1000). Click on this button and type 1005 into the pop-up window. Extension 1005 will ring and once the handset is picked up, the conversation between Jane Doe (1000) and SIP member 1500 will be heard)
(Button)
- Transfer

Transfer a party from the active conversation to a different destination. When you click on this button you will be prompted to select destination to which call will be transferred.
- (E.g. Let’s say queue SIP member 1500 is on call with caller Jane Doe (1000). Click on this button and type 1005 into the pop-up window. Caller Jane Doe (1000) will be transferred to extension 1005)
- (Button)
- Hangup

Hang up the active conversation. When you click on this button you will be prompted to confirm you want to hang up selected call.
- (E.g. Let’s say queue SIP member 1500 is on call with caller Jane Doe (1000). Click on this button and confirm you want to hang up selected call. The conversation between caller Jane Doe (1000) and SIP member 1500 will be terminated).
- (Button)
Callers
- This section shows real time data about Queue callers with following details:
- Channel ID
- Channel ID
(E.g.1574073482.39)
(Display)
- Caller ID
- Caller ID
(E.g. Jane Doe (1000))
(Display)
- Destination
- Queue member who is on call
(E.g. Agent/1001)
(Display)
- State
- Call state
(E.g. CONNECTED)
(Display)
- Time
- Call time
(E.g. 00:05:30)
(Display)
- Transfer

- Transfer a party from the active conversation to a different destination. When you click on this button you will be prompted to select destination to which call will be transferred.
(E.g. Let’s say queue agent 1001 is on call with caller Jane Doe (1000). Click on this button and type 1005 into the pop-up window. Caller Jane Doe (1000) will be transferred to extension 1005)
(Button)
- Hangup

Hang up the active conversation. When you click on this button you will be prompted to confirm you want to hang up selected call.
- (E.g. Let’s say queue agent 1001 is on call with caller Jane Doe (1000). Click on this button and confirm you want to hang up selected call. The conversation between caller Jane Doe (1000) and agent 1001 will be terminated).
- (Button)
Queues Panel

- Clicking on the Queues Panel button will open popup iframe with the list of all available queues and general information about each queue.
- Refresh
- Select your preference in the drop-down menu in regards to how often you would like the page to be refreshed.
(E.g. Select ’10 sec’ in this field, for example, to automatically refresh data every 10 seconds)
(Select box)
- Fields
- Select your preference in regards to fields, colors and fonts sizes you would like to be shown on the page
(E.g. Calls/Black/Small)
(Checkbox/Color picker/Select box)
- Only Total
- Show only total data or per queue data
(E.g. No)
(Select box)
- Only Today
- Choose whether to show only today’s data or not
(E.g. Yes)
(Select box)
- Queues filter
- Select which queues to monitor
(E.g. Sales, Support)
(Multi select) - Monitored queues are displayed in real time with the following details:
- Name
- Queue Name
(E.g. MainTest)
(Display)
- Calls
- Number of calls serviced in the queue
(E.g. 10)
(Display)
- Answ.
- Number of answered calls.
(E.g. 4)
(Display)
- Aband.
- Number of abandoned calls.
(E.g. 6)
(Display)
- Wait.
- Number of the calls waiting in the queue
(E.g. 1)
(Display)
- A. Idle
- Currently idle Agents.
(E.g. 1)
(Display)
- Not.R
- Number of agents which are not ready.
(E.g. 1)
(Display)
- A.OnCall
- Agents currently on a call.
(E.g. 2)
(Display)
Add/Edit Queue
Clicking on ‘Add/Edit’ Queue will open standard options shown below

- Queue Name:
- Unique queue network name/identifier
(E.g. Provide a unique queue identifier/name here)
([a-z][0-9])
- Queue Number:
- Unique network queue number
(E.g. This number is to be dialed in order to access the queue)
([0-9])
- Max Waiting Callers:
- Maximum number of callers allowed to wait in a queue at the same time. This number should be set in accordance with the number of members answering the queue calls
(E.g. If this field is set to 4, only 4 callers will be allowed to enter the queue. If caller number 5 tries to enter the queue he will be transferred to <%PRODUCT%> ‘Redirect Extension’ number).
([0-9])
- Ring to Answer:
How many rings will be played to a caller before call enters the queue.
Set this value to 0 if you would like calls to hear Queue music on hold as soon as call is connected.
(E.g. 5) ([0-9])
- Members and agents:
- This button opens up a screen in which you can add and manage queue members
(E.g. Click on the button to manage queue members)
(Button)
Agents
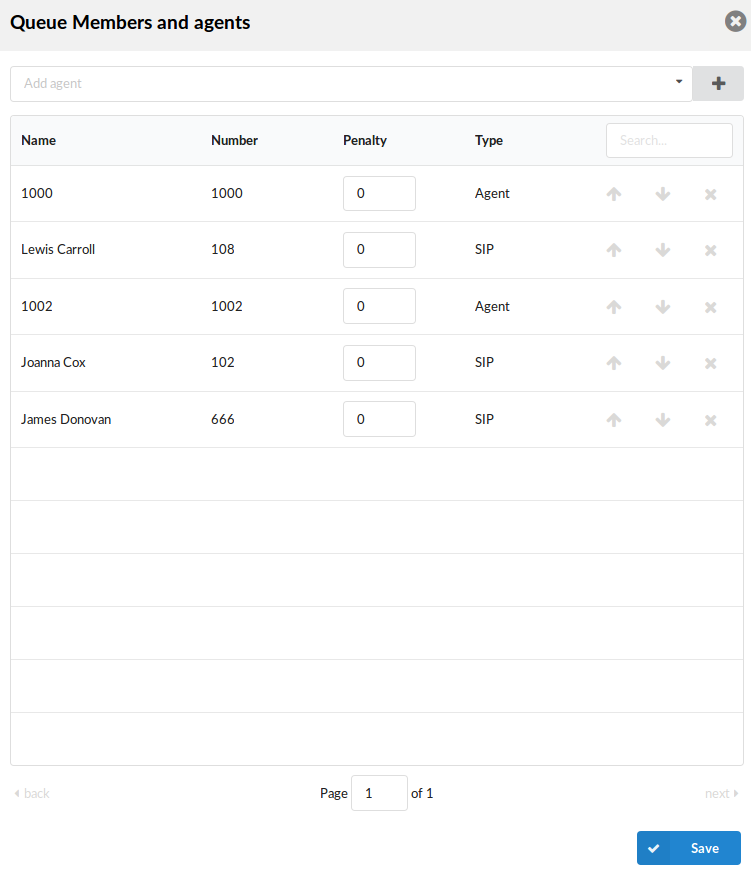
- Queue Members and Agents
- Pressing button Members and agents list will open Members and agents pop up window.
- Select agents
- Dropdown where you can select one or more Agents/Agents Groups/Extensions to add to Queue Members list
(E.g. Agent/1001, Agent/1002)
(Multi select)
- Press this button to add selected Agents/Agents Groups/Extensions to Queue Members list
(button)There is a table which shows queue members with following details:
- Name
- Extension name
(E.g. Sales 1)
([0-9][a-z])
- Number
- Number of the extension on the system
(E.g. 1001)
([0-9])
- Penalty
This value can be set per member, so the system can decide which priority to use when sending calls to members
(E.g. Set values between 0 and 10 where 0 is the highest priority and 10 is the lowest priority. If the strategy is defined as ‘ringall’, then only those available members with the lowest priorities will ring. ).
([0-10])
NOTE: If extension does not pick up it will not automatically go to the next extension. It will keep ringing until it is picked up. It will only go to the next extension if the current extension is either busy or unavailable.
- Type
- Queue member type
(E.g. Agent)
(Display)
- Search
- Search queue members
(E.g. Provide a search phrase here to filter the records)
([a-z][0-9])
- Move up

Move queue member one place up in queue members list
- Move down

Move queue member one place down in queue members list
- Remove member

Remove member from queue members list
Advanced Options
General
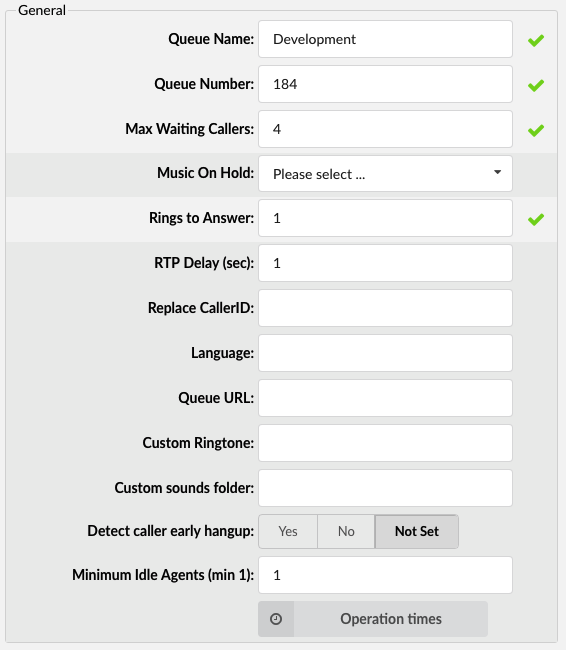
- Music On Hold:
- Select MOH(Music On Hold) class name. All sound files belonging to this MOH class will be played to users in queue
(E.g. User A enters the queue. After the greeting message is heard, all sound files belonging to selected MOH class are played in the background)
(Select box)
- RTP Delay (sec):
- Delay time in seconds inserted before the queue greeting message is played. This solves the ‘half-played’ file problem. Keep this value between 1-3
(E.g. User A enters the queue and hears ‘..r call is first in line…’ and wonders what was that.. what did the voice say!? Set this field to 1 so that 1 second pause is added before the message is played. Now, when user A enters the queue he will hear ‘Your call is first in line…’).
([0-9])
- Replace CallerID:
- Replace the caller id with the custom value
(E.g. Type ‘Lobby – %CALLERID%’ to display the caller id information as ‘Lobby – 5552879’ where 5552879 is the actual number calling in)
([a-z][0-9])
- Language:
- Define custom language for all sound files played by the queue
(E.g. To play Spanish sound files to all users waiting in the queue, type ‘es’ here. NOTE: Steadfast-UC MT comes with English sound files by default. To install sound files in other languages, please see ‘ Settings: Protocols: Sip: Language’ for more information)
([a-z])
- Queue URL:
- Send the following URL to agents softphone, if it supports that option, and the softphone can open that URL so agent can see callers additional info if available. This option must be supported by softphone for it to be used.
(E.g. Additional info on Queue URL field can be obtained here)
([a-z][0-9])
- Custom Ringtone:
- Ring agent phones with custom ringtone set here
(E.g. <Simple-2>)
([0-9][a-z])
- Custom sounds folder:
- Custom sounds folder name
Create a new folder for these sounds in
/opt/pbxare/pw/var/lib/asterisk/sounds/
- and put your custom queue sounds here.
([a-z][A-Z])
TIP:
Sounds should be named as follows:
- queue-youarenext – Your call is first in line and will be answered by the next available representative)
- queue-thereare – You are currently caller number
- queue-callswaiting – Waiting to speak with a representative
- queue-holdtime – The estimated call time is currently
- queue-minutes – Minutes
- queue-seconds – Seconds
- queue-lessthan – Less than
- queue-thankyou – Thank you for your patience
- queue-periodic-announce – All of our representatives are currently busy. Please stay on the line and your
- call will be answered by the next available representative
- Detect caller early hangup
- Set this feature to No to pass abandoned calls to queue and still have these in statistics or set it to Yes if abandoned call during greeting should be detected and not routed to queue and shown in Statistics.
(E.g. Yes, No, Not Set)
(Option button)
- Minimum Idle Agents (min 1)
- Minimum Idle Agents that must be in queue. This is used in blending mode.
- NOTE: For the blending mode to work, users need to define certain criteria for each queue. One of the required fields to define is the minimum number of Idle Agents that this Queue must have, as it is shown in the screenshot. This will tell the system to primarily try to fulfill Inbound requirements before putting Agents in Outbound.
- For instance, if the Minimum Idle Agents field is set to “2” on a Support Queue, the system will try to add Agents from Outbound Campaign to the Support Queue. If at any time, Agents go beyond 2, all extra Agents will be put in the dedicated Campaign.
- The most important element to understand is that the blending mode is a lazy system that has no timeout triggering, unlike some other solutions. This means that Agents themselves are triggering the blending system by doing some actions like Ending Call/Logging in/Unpausing. This reduces complexity and provides stability to the system.
- In a real case scenario, Agents are always busy and are handling some calls, therefore, there is always a sufficient number of actions that can trigger the blending mode. The advantage of having it done this way is that it ensures avoiding any other unexpected behaviors from the Agent’s point of view. If it was done differently, the system would be busy and constantly switch the Agent from IN to OUT, so the Agent could lose a lot of time just trying to resolve from which direction he received a call. Instead of doing so, the Agent already knows that s(he) could be moved to Queue or Campaign only when the current call is ended or because of some other predefined action.
Operation Times
Set the queues open/closed times. Depending on the time when call is received, the call can be redirected to different Steadfast-UC destinations
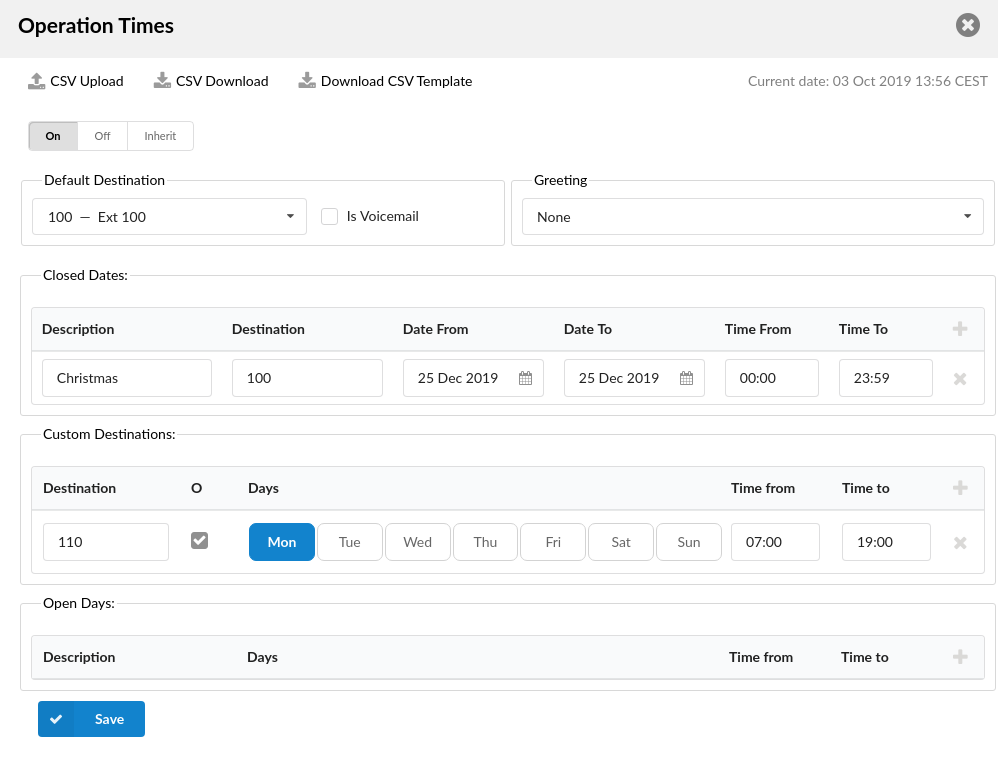
- CSV Upload
- CSV Download
- Download current Operation Times configuration to csv file
(Button)
- Download CSV Template
- Download template of Operation Times configuration to csv file
(Button)
- Operation Times:
Enable operation times
(E.g. Yes, No, Inherit)
(Option buttons)
The Inherit option will allow administrators to simply put the Higher Level Operation Times settings back into effect if deemed necessary. Previously, when Operation Times were set, it could be either turned on or off, but it could not be reset to use the Operation Times rules set on the higher level (Server or Tenant).
- Default Destination
- Steadfast-UC extension all calls are redirected to during the closed time hours
(E.g 1000)
([0-9])
- Is Voicemail
- Whether default destination is Voicemail or not
(checkbox)
- Greeting:
Greeting sound file played to callers during the closed times
(E.g. greeting-***)
(Select box)
Description of destinations follows in this priority order:
-
- Closed dates: Sets the specific date/s when all calls are redirected to the ‘Default Destination’. If the ‘Destination’ field in the Closed dates is set, calls will not go to the ‘Default Destination’ but to this number.
- Custom Destinations: Redirects all calls received during set hours to the Steadfast-UC extension provided here
- Open dates: Sets the working hours during which DID is to redirect calls as set in DID Add/Edit window. If any call is received during the hours not set here, ‘Custom Destination’ are checked, and if they do not apply, the call is redirected to ‘Default Destination’ (Closed dates)
Queue Full

- Activate Callback
- Choose whether callback should be activated when queue is full
(E.g. Yes, No, Not Set)
(Option buttons)
- Redirect Destination
- Queue full redirect extension number
(E.g. If queue 2000 accepts a maximum of 4 users waiting at the same time, any new user that enters queue 2000 :will be redirected to the extension number provided here)
([0-9])
- Redirect to Voice Mail
- Choose whether the redirect extension is a voicemail
(E.g. Yes, No, Not Set)
(Option buttons)
Queue Timers
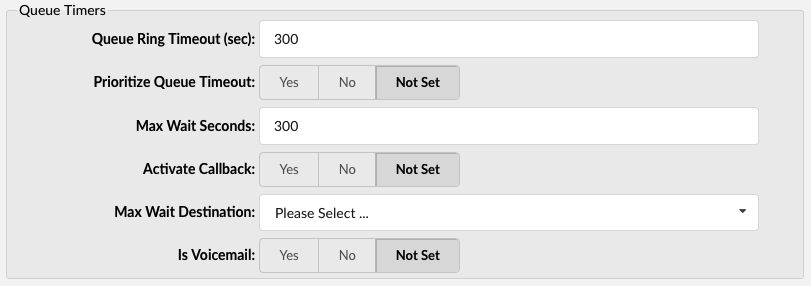
- Queue Ring Timeout (sec):
- Number of seconds during which the members will be rung, after which the Position Announcement will be played to the caller, if it is enabled
(E.g. Members extensions are ringing for 10 seconds. After that time, Position Announcement is played to caller and then Agent(s) are rung again).
([0-9])
- Prioritize Queue Timeout
- Used to control the priority of the two possible timeout options specified for a queue. Queue Ring Timeout field has a timeout value that can be specified to control the absolute time a caller can be in the queue. The timeout value in queues.conf controls the amount of time (along with retry) to ring a member for. Sometimes these values conflict, so you can control which value takes precedence. The default Not Set setting will use Queue Ring Timeout value, same as setting this to Yes. No will override Queue Ring Timeout field and use value from queues.conf.
(E.g. Yes, No, Not Set)
(Option buttons)
- Max Wait Seconds:
- Maximum time a caller can wait in a queue. Once this time is exceeded caller will be redirected to ‘Max Wait Destination’ number or callback will be activated.
(E.g. User A is waiting 5 minutes already in the queue. If this field is set to 300(300s = 5min), A will be redirected to ‘Max Wait Destination’ or callback will be activated depending on configuration)
([0-9])
- Activate Callback
- Choose whether callback should be activated when Max Wait Seconds time is exceeded
(E.g. Yes, No, Not Set)
(Option buttons)
- Max Wait Destination:
- This option works along with the ‘Max Wait Seconds’ field. Drop down to select the extension to which caller will be redirected once time set under ‘Max Wait Seconds’ exceeds.
(E.g. User A is waiting 5 minutes already in the queue. If ‘Max Wait Seconds’ field is set to 300(300s = 5min) and Max Wait Destination option is set, A will be redirected to this destination)
([0-9])
- Is Voicemail:
- Set whether the max wait destination is pointing to voicemail.
(E.g. Yes, No, Not Set)
(Option buttons)
Empty Queue

- Join Empty
- Set whether a caller can join a queue if no agent is logged in or unavailable
Example:
It is recommended to set this option to ‘No’. Do not allow user to enter the queue if the call will not be answered by anyone. Following options are available:Yes – Join queue if no agents or only unavailable agents are in the queue
No – Do not join queue if no agents available
(Select box)
NOTE: If ‘Join empty’ is set to No, callers will not enter the queue only if all agents are not logged in or unavailable. If they are paused, they are considered as available.
- Leave when empty
- When there are no agents inside a queue, callers will leave it depending on the setting
Example:- No – This option is disabled
- Yes – If you wish to remove callers from the queue if there are no agents present
- (Select box)
- Activate Callback
- Choose whether callback should be activated when there ae no agents inside a queue
(E.g. Yes, No, Not Set)
(Option buttons)
- Empty Destination:
- When queue doesn’t have any agent logged in, redirect callers to following destination
(E.g. 7001)
([0-9])
- Is Voicemail:
- Set whether the empty destination extension is pointing to voicemail.
(E.g. Yes, No, Not Set)
(Option buttons)
Greeting

- Greeting:
- Select a greeting file to play to all callers waiting in a queue.
(E.g. Record a custom sound greeting file (e.g. ‘All our representatives are busy…’) and select that file. This file will be played to all callers once they enter the queue).
(Select box) - NOTE: File name has to be in the following format ‘queue-greeting-$NAME.gsm’
- Wait Seconds:
- Delay time in seconds inserted before playing the greeting message. This delay is useful when users do not hear the beginning of the greeting message. Keep this value between 1-3 seconds.
(E.g. John enters the sales queue, but cannot hear the beginning of a greeting sound file (e.g. ..ur representatives are busy…). Set this option to 1. This will insert one second of silence before the greeting file is played and should fix the partial sound file error. Now, all callers entering the queue should hear the full greeting message (e.g. All our representatives are busy…))
([0-9])
Position Announcements

There are two types of position announcements: ‘Hold Time’ (Tells the queue position) and ‘Periodic Announcements’ (Plays custom message)
- Announce Hold-Time:
- Enable callers waiting in a queue to hear the hold-time announcements.
(E.g. Setting this option to ‘Yes’ will enable the hold-time announcements. A single caller waiting in a queue would hear ‘The estimated hold time is currently N minute. Thank you for your patience’ message).
(Option buttons)
- Announce Position:
- Enable callers waiting in a queue to hear the position announcements.
(E.g. Setting this option to ‘Yes’ will enable the position announcements. A single caller waiting in a queue would hear ‘Your call is now first in line and will be answered by the next available representative. Thank you for your patience’ message).
(Option buttons)
- Announce Frequency:
- How often to play the hold-time announcement message (time in seconds).
- NOTE: If you set this option to ‘0’, the announce message will not be played.
- (E.g. If this field is set to 30, a single caller waiting in queue will hear ‘Your call is now first in line and will be answered by the next available representative. Thank you for your patience.’ message every 30 seconds) The estimated hold time is currently N minute.
([0-9])
- Min. Announce Frequency
Specifies the minimum amount of time that must pass before we announce the caller’s position in the queue again. This is used when the caller’s position may change frequently, to prevent the caller from hearing multiple updates in a short period of time. Default value is 15 seconds.
(E.g.30) ([0-9])
- Announce Round Seconds:
- Rounding level for hold-time announcements. If this is set to 0, only minutes, not seconds, are announced; other possible values are 0, 5, 10, 15, 20 and 30.
(E.g. When set to 30, a wait time of 2:34 will be rounded to 2:30.)
(Select box)
Periodic Announcements

- Periodic Announce:
- Select the sound file that is played periodically to callers waiting in a queue.
(E.g. Record a message ‘Hang in there buddy!’ and set it as a periodic announcement. This message will be played to callers every ‘Periodic Announce Frequency’ seconds)
(Select box) - NOTE: File name has to be in the following format ‘periodic-announce-$NAME.gsm’
- Periodic Announce Frequency:
- Time interval in seconds at which the periodic message is to be played.
(E.g. If this field is set to 30, all callers waiting in queue will hear the ‘Periodic Announce’ message every 30 seconds, as long as they stay in the queue).
([0-9])
- First Periodic Announce Delay:
- The minimum number of seconds between position announcements. Default value is 15 seconds.
(E.g. 30)
([0-9])
Agents Announcements

Agents Announcements
- Agent Announce:
- Select pre-recorded message that will be played to the agent before the call is connected.
NOTE: In order to be displayed in the drop down list, sound file must have ‘agent-announce-‘ prefix.
- Report Holdtime:
- Set this option to yes to inform the agent for how long caller was in queue before the call was connected.
(E.g. Yes, No, Not Set)
(Option buttons)
CRM Features
- New Lead URL:
- If incoming call CallerID is unknown, it will be transferred to URL entered in New Lead URL field.
Agents
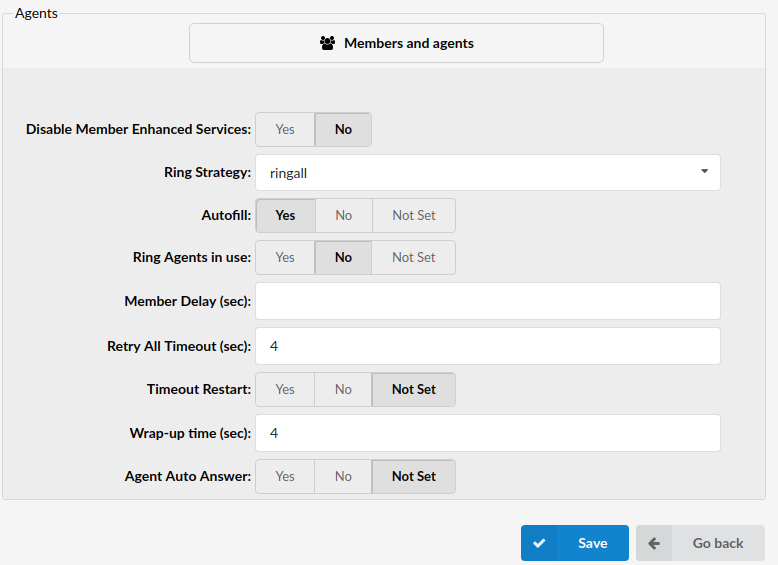
- Disable Member Enhanced Services
- When set to Yes, enhanced services that are enabled on the extensions which are queue members or agents will not be applied if a queue call is passed to them.
NOTE: Dynamic and callback agents will never have Enhanced Services rules applied to their calls, regardless of what option is selected for Disable Member Enhanced Services feature. This is expected behavior and cannot be altered !
(E.g. Yes, No)
(Option buttons)
- Ring Strategy
- Set the way calls are transferred to queue members answering the calls.
Available options:-
- ringall – Ring all available Members until one answers (default)
- linear – When used with dynamic members, the members will be rung in the order in which they were logged in.
- leastrecent – Rings the interface that least recently received a call. In a queue where there are many calls of roughly the same duration, this can work. It does not work as well if an agent has been on a call for an hour, and their colleagues all got their last calls 30 minutes ago because the agent who just finished the 60-minute call will get the next one.
- fewestcalls – Rings the interface that has completed the fewest calls in this queue. This can be unfair if calls are not always of the same duration. An agent could handle three calls of 15 minutes each and her colleague had four 5-second calls; the agent who handled three calls will get the next one.
- random – Rings a random interface. This actually can work very well and end up being very fair in terms of evenly distributing calls among agents.
- rrmemory – Round robin with memory. rrmemory should pick up at the last interface it was at when the last call came into the queue.
- rrordered – Same as rrmemory, except the queue member order from the config file is preserved so interfaces will ring in the order specified in this configuration file. If you use dynamic members, the members will be rung in the order in which they were added.
- wrandom – Rings a random interface, but uses the member’s penalty as a weight when calculating their metric. So a member with a penalty of 0 will have a metric somewhere between 0 and 1000, and a member with a penalty of 1 will have a metric between 0 and 2000, and a member with a penalty of 2 will have a metric between 0 and 3000. Please note, if using this strategy, the member penalty is not the same as when using other queue strategies. It is ONLY used as a weight for calculating metric.
-
- (E.g. linear)
(Select box)
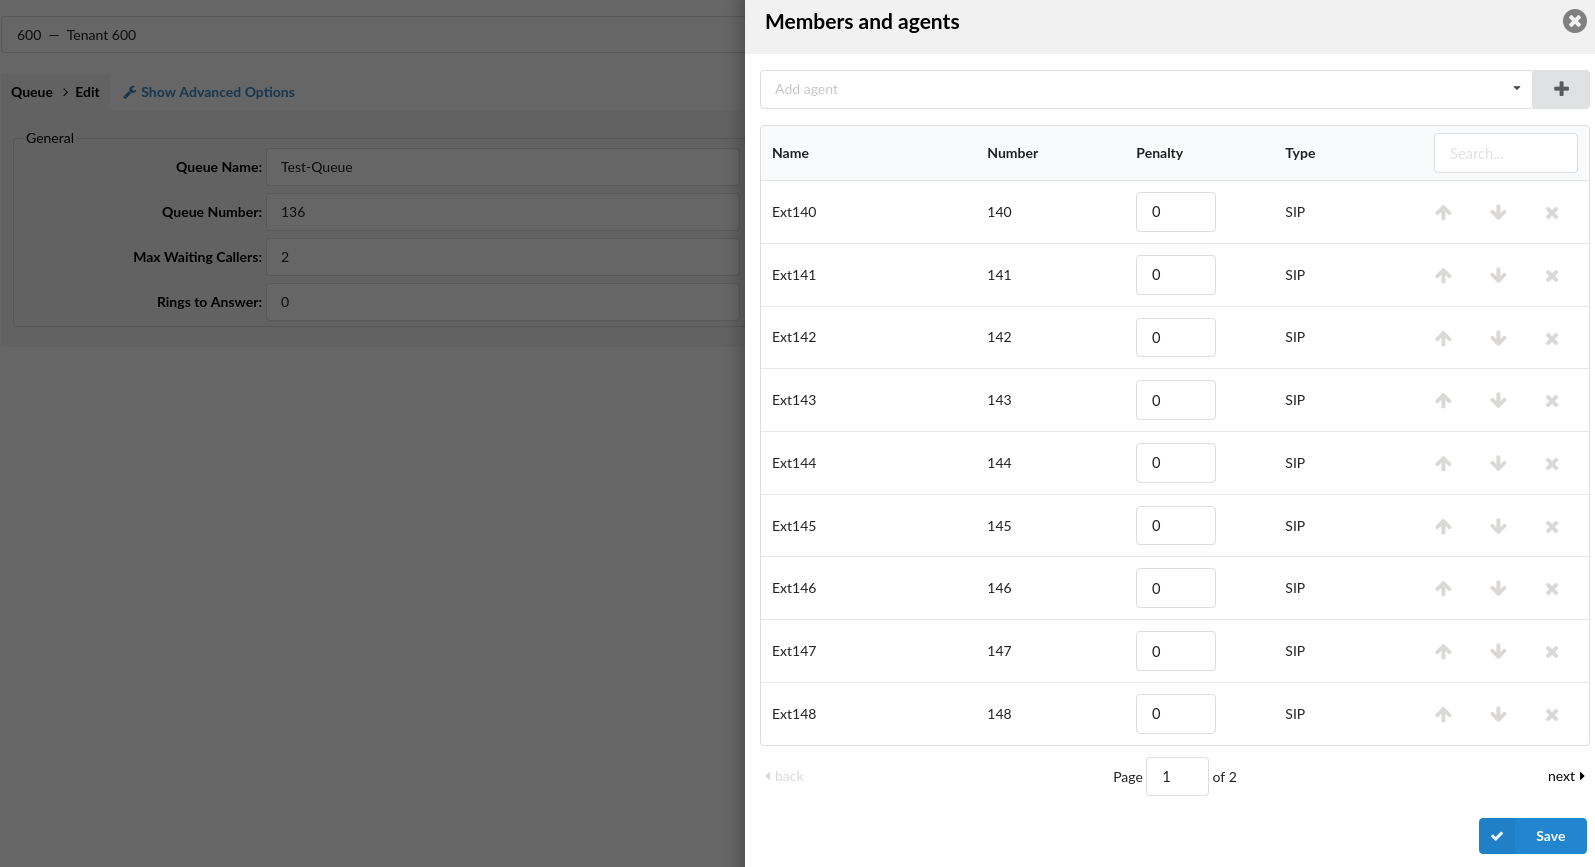

- NOTE: In order to ensure the system’s stability and prevent any potential issues from causing the malfunction, the default number of Queue Members and Agents that may be dialed in a single Queue is set to 9. This number limitation is applied when the ‘ringall’ Ring Strategy is set.
- Therefore, if there are more than 9 Members and Agents in a Queue with the ‘ringall’ Ring Strategy, upon saving the settings for that Queue, a warning message with the following information should appear: “Due to limitations of ringall strategy, only the first 9 members will be called”.
- (E.g. A user creates a Queue with 12 Members and Agents as shown in the screenshot and sets the Ring Strategy to ‘ringall’. When s(he) tries to save the settings, a warning message appears as shown in the screenshot. A user is able to save the Queue which has 12 Members and Agents, however, only 9 of them will be dialed in a random manner. The warning message doesn’t appear, if there are 9 Members/Agents or less.)
- Autofill
- Should callers be served one by one or in parallel fashion
(E.g. With this option turned ‘Off’, even if there are five agents available, calls will not be transferred to them until the first caller waiting in a queue is connected to an agent. When the first caller gets served, caller number two gets served and all others keep waiting. It is recommended to keep this feature always turned ‘On’ so callers can be served in order)
(Option buttons)
- Ring Agents in Use
- Whether agents in use should be called when a new caller comes into the queue
(E.g. If the agent is already in an active conversation, with this option set to ‘Yes’, the Agent extension will ring when a new caller enters the queue)
(Option buttons)
- Member Delay (sec)
- This field is the same as RTP Delay, only this option is set for the agent answering the queue calls. Before the call is transferred, custom queue information can be played to an agent so that the agent knows from which queue the call is coming. This solves the ‘half-played’ file problem. Keep this value between 1-3
(E.g. Agent X is to answer the call coming from the queue. If the ‘Queue Announce’ is set to play the custom sound file (‘This call comes from the Lobby Queue’) but only ‘…s call comes…’ is heard, set this field to 1 so that 1 second pause is added before the message is played and entire message is played ‘This call comes from…’)
([0-9])
- Retry All Timeout
- Time interval in seconds, for how long to wait before trying the queue agent again.
(E.g. If agent Smith cannot answer the incoming queue call and hangs up the ringing line, the call will not be transferred back to his extension for a time in seconds provided in this field).
([0-9])
- Timeout Restart
- If this option is set to yes and a BUSY or CONGESTION signal is received on the line, the agent’s timeout for answering will be reset. This can be useful with agents that have permission to cancel a call with a reject.
(E.g. A call enters the queue and is transferred to Agent X. Agent X has a Polycom phone (for example) and sends a BUSY signal by hitting the ‘Reject’ key. This will reset the internal timer. The call will be transferred to other queue agent(s). The original agent will not be contacted until all other agents are tried and the call does not get answered by any of them).
(Option buttons)
- Wrap-up Time (sec):
- After a successful call, this will determine how long to wait (time interval in seconds) before sending a new call to a potentially free agent/member.
(E.g. 4)
([0-9])
- Agent Auto Answer:
- Choose whether callback agent’s phone will be answered automatically. Only works for supported UAD.
(E.g. Yes, No, Not Set)
(Option buttons)
Queue Rule

- Queue Rule:
-
- Select which queue rule will be in charge when matching agent who will answer a call.
Note: If it is set to ‘None’ it will work as it works now. Once call enters the queue Rule for that call cannot be changed
(E.g. Rule I)
(Select box)
- Select which queue rule will be in charge when matching agent who will answer a call.
Recording

- Record Queue Calls:
- Once this feature is activated, all queue calls will be recorded in the desired sound format.
(E.g. John enters the ‘Sales’ queue and is transferred to ‘Queue Agent Smith’. Their entire conversation is recorded and available for review from ‘Reports’).
(Option buttons)
Incoming Options
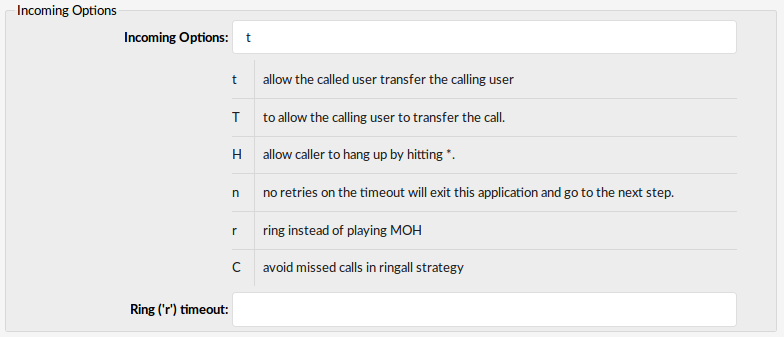
- Incoming Options Set the advanced queue call options.
-
- Available options:
- t – allow the called user to transfer the calling user
- T – allow the calling user to transfer the call
- H – allow the caller to hang up by pressing *
- n – no retries on the timeout; will exit queues and go to the next step
- r – ring instead of playing MOH
- C – avoid missed calls in ringall strategy
- w – Instant Recording with Monitor
- x – Instant Recording with MixMonitor
- Available options:
- ([a-z])
- Ring (‘r’) timeout
- When ‘r’ is selected as Incoming Options and this timeout is used, queue will first ring entered number of seconds after which MOH will start
(E.g. 10)
([0-9])
Dial Options:
- t – Allow the called user to transfer the call by hitting #
- T – Allow the calling user to transfer the call by hitting #
- r – Generate a ringing tone for the calling party, passing no audio from the called channel(s) until one answers. Use with care and don’t insert this by default into all of your dial statements as you are killing call progress information for the user. Really, you almost certainly do not want to use this. Asterisk will generate ring tones automatically where it is appropriate to do so. ‘r’ makes it go the next step and additionally generate ring tones where it is probably not appropriate to do so.
- H – Allow the caller to hang up by dialing *
- C – Reset the CDR (Call Detail Record) for this call. This is like using the NoCDR command
- w – Allow the called user to start recording after pressing *1 or what defined in features.conf, requires Set(DYNAMIC_FEATURES=automon)
- x – Allow the called user to start recording the conversation to disk via MixMonitor.
Exit Digit

- Use Exit Digit
- Should users be able to exit the queue by dialing a single digit and be automatically redirected to a preset Steadfast-UC destination.
- Example:
- John enters the sales queue. A greeting message explains that the user may quit the queue by pressing the digit defined under the ‘Exit Digit’ option, and be transferred directly to the operator or some other destination (set under the ‘Destination’ option).
- (E.g. Yes, No, Not Set)(Option buttons)
Exit Digit
- Define the exit digit here. Once this digit is dialed by the user waiting in queue, it will transfer the call directly to the set ‘Destination’
- Example:
- John enters the sales queue. The greeting message explains that the user may quit the queue by pressing the digit defined here (e.g. 9) and is transferred directly to the operator or some other destination (set under the ‘Destination’ option).
- ([0-9])
- Activate Callback:
- Choose whether callback should be activated on Exit Digit
(E.g. Yes, No, Not Set)
(Option buttons)
- Destination
- Local Steadfast-UC destination number that is dialed once the ‘Exit Digit’ is dialed.
- (E.g. John enters the sales queue. The greeting message explains that the user may quit the queue by pressing the digit defined under the ‘Exit Digit’ option, and be transferred directly to the Steadfast-UC destination defined here).
- ([0-9])
- Is voicemail:
- Set whether the exit digit destination is pointing to voicemail.
(E.g. Yes, No, Not Set)
(Option buttons)
Abandoned Calls Notification

Here you can set whether there will be any notification when the call inside a queue is abandoned.
- Enable Notification:
- Enable or disable Abandoned Calls Notification feature
(E.g. Yes, No, Not Set)
(Option buttons)
- Notification E-mail address:
- The e-mail address which will receive notifications of abandoned calls, where an abandoned call is one where the caller hangs up the call while waiting to be answered
(E.g. admin@domain.com)
([a-z][0-9])
Callback
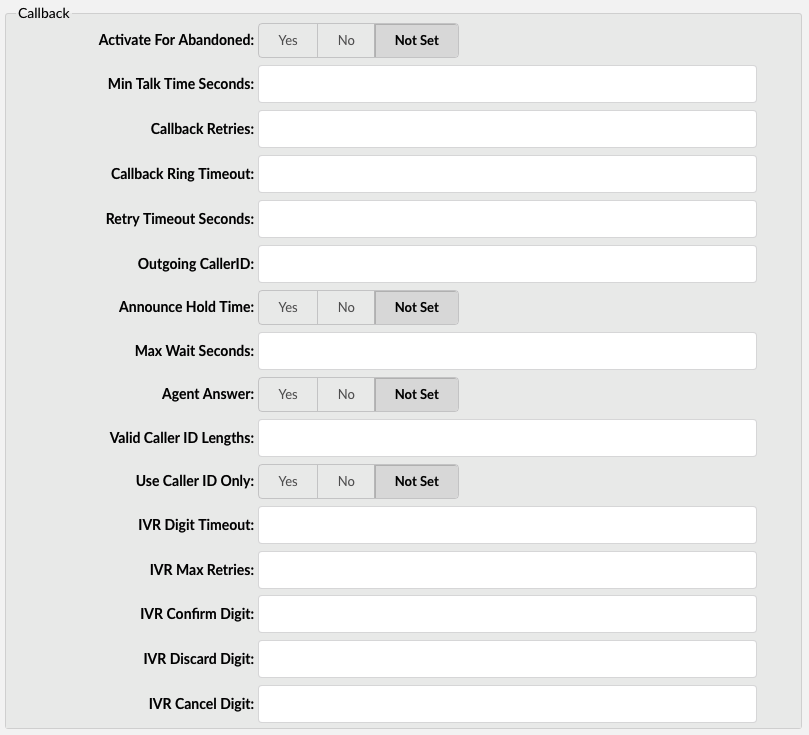
- Queue Callback saves customers from long, frustrating waits and brings convenient phone support right to them. With the Queue Callback feature, callers entering a phone queue have the option to request a callback and then just hang up. No more long hold times, no more fighting other callers to get through – customers simply put in a call and then continue going about their work while waiting for the callback. It’s the perfect solution for everyone.
- This feature is extremely customizable, able to be catered to meet your needs. Things such as the maximum wait time, number of callback retries, and the amount of time to wait in between retries can be customized. The menu has several options for clients to submit their information for a callback.
- NOTE: Queue callback is a license-enabled feature so in case it is not available in your queue settings, but you would like to have it, please contact your account manager for more information.
- Activate For Abandoned:
- Whether Queue Callback will be activated for calls that were abandoned before an agent answered.
(Yes, No, Not Set)
- NOTE: Options Activate for Abandoned and Min Talk Time Seconds aren’t connected anymore so if one wants to activate callbacks for abandoned calls they will set ‘AFA’ only, and if they want to activate callbacks for calls hung up in first ‘N’ seconds after agent answer, they will set ‘MTTS’.
- Min Talk Time Seconds:
- The minimum time the call must last after an agent answers it in order for the callback not to be activated.
- For example, if we set this value to 10, calls that get disconnected in less than ten seconds after call is answered by agent will be called back by the Steadfast-UC, assuming that it got disconnected unintentionally.
(E.g. 5)
([0-9])
- Callback Retries:
- Number of retries the callback will try to reach the number of abandoned call.
(E.g. 3)
([0-9])
- Callback Ring Timeout:
- Time in seconds that the UAD/Phone will ring for callback.
(E.g. Set 30 in this field and callback will ring for 30 seconds)
([0-9])
- Retry Timeout Seconds:
- Delay between callback retries, in seconds.
(E.g. 60)
([0-9])
- Outgoing CallerID:
- Set the CallerID the caller will see when the system performs the callback.
(E.g. John Doe <1000>)
- Announce Hold Time:
- Set this value to Yes for the system to tell the called user how long they will wait until their call is answered by an agent.
(E.g. Yes, No, Not Set)
(Option buttons)
- Max Wait Seconds:
- This is the maximum time that system will wait to make a Queue Callback.
- (E.g. Max Wait Seconds is set to 900 and the caller has activated the Callback feature. Callback will wait 900s for the free agent to be connected to the caller. If there are no available agents in 910 seconds, the Callback will not make a call).
([0-9])
- Agent Answer:
- Whether to first call the agent before the callback tries to reach the number of abandoned call.
(E.g. Yes, No, Not Set)
(Option buttons)
- Valid Caller ID Lengths:
- Set the value for a valid caller ID length, separated with commas.
(E.g. 3,6,9,12)
([0-9])
- Use Caller ID only:
- Use callback only with the Caller ID rather than allowing the caller to enter a number at which they would like to be called.
(E.g. Yes, No, Not Set)
(Option buttons)
- IVR Digit Timeout:
- Type in and confirm the number of seconds the system should wait before the IVR Digit Timeout. The default value is 3 seconds.
(E.g. 5)
([0-9])
- IVR Max Retries:
- Maximum number of wrong entries in the IVR before the user is disconnected.
(E.g. 3)
([0-9])
- IVR Confirm Digit:
- Press this number to confirm your entry in the callback IVR. Default 1.
(E.g. 2)
([0-9])
- IVR Discard Digit:
- Press this number to discard your entry in the callback IVR. Default 2.
(E.g. 3)
([0-9])
- IVR Cancel Digit:
- Press this number to cancel your entry in the callback IVR. Default 3.
(E.g. 1)
([0-9])
Callback Announcements
- Caller Announce:
- Play a custom message to a caller before they answer the call.
The file name has to be in the following format ‘qc-announce-caller-announce-$NAME.gsm’.
- Agent Announce:
- Play a custom message to a queue agent before they answer the call.
The file name has to be in the following format ‘qc-announce-agent-announce-$NAME.gsm’.
Rules

Different agents in queue can have different penalties. SBR allows one to create Sets of Rules to change the value of the Min Penalty and Max Penalty channel variables in mid-call. This means that it is possible to open a call to more members or potentially a different set of members. Agents with different penalties can answer a call in different period of time, depending on the Rule.

- This screen lists all system rules with the following details:
Add Queue Rules
- Rule Name
- Rule name
(E.g. Rule I)
(Display)
- Rule configuration

Edits the rule configuration
(E.g. Click to edit rule configuration)
(Button)
- Delete a rule

Deletes a rule from the system
(E.g. Click to delete a rule from the system)
(Button)
Search

Search
- Search Rules by Name
- Search:
- Search phrase
(E.g. Provide a search phrase here and hit enter to filter the records)
([a-z][0-9])
Add/Edit Queue Rule
- General
-
- Rule Name:
Name that can be set as rule name.
Rule Name
(E.g. Rule I)
([a-z][0-9])
- Rule Configuration
-
- Caller Hold Time (sec):
Caller hold time in queue when rule configuration change occurs
(E.g. >= 60)
([0-9]) - Min Penalty:
Agents with penalties smaller than this value can’t answer the call
(E.g. 3)
([0-9]) - Max Penalty:
Agents with penalties larger than this value can’t answer the call
(E.g. 10)
([0-9])- Add button icon

- Add button icon
- This button is used to add new row into Rule Configuration table
(button)- Drag to reorder icon

- Drag to reorder icon
- Click on this button on move to reorder Rule Configuration table
(button)- Remove icon

- Remove icon
- Remove row from Rule Configuration table
(button)
- TIP: Default values for Min and Max Penalties are 0, which means that when a call comes in queue only agents with penalties 0 can answer a call.
CDR
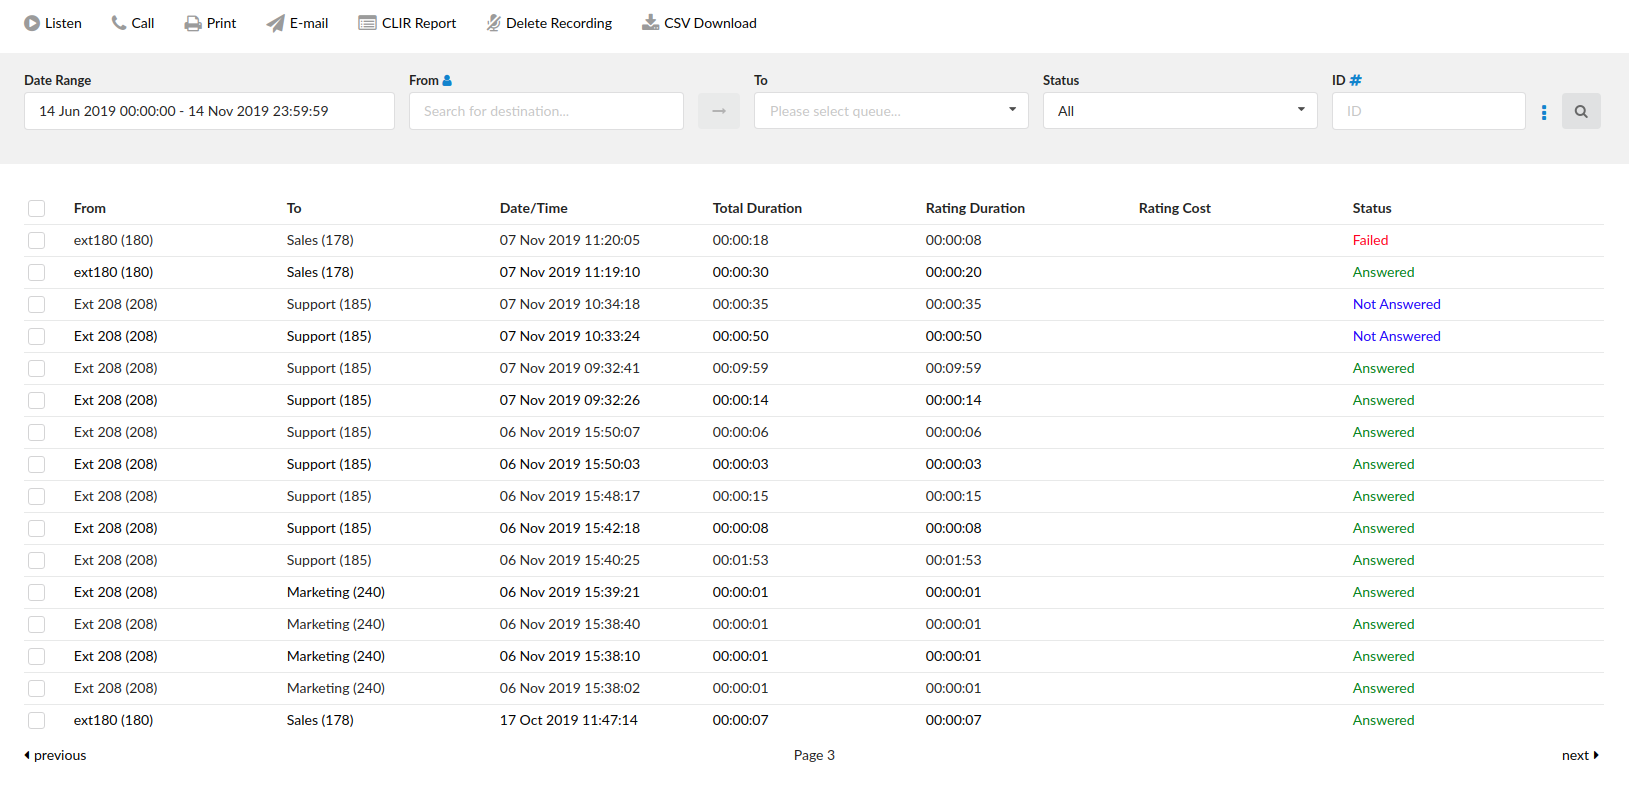
Queues CDR
- Listen
- Once the ‘Listen’ icon is displayed next to a call record, it means that the specific queue call was recorded.
There’s also an integrated recordings player, enabling users to listen to Steadfast-UC queue call recordings directly from their browser and navigate through the recording with a simple click of a mouse.
Also the Download recordings option is available, in case you would like to store it on your hard drive.
- Call
- Steadfast-UC extension that will make the call
Example:
Provide any Steadfast-UC extension number here, 1001 for example
([0-9])
- Destination:
- Destination that will be dialed by the ‘Caller’ extension
(E.g. To select a destination, first check the box next to a CDR record. This field will display two destinations listed under the ‘From’ and ‘Destination’ selected records)
(Select button)
TIP: After setting the ‘Caller’ and ‘Destination’ extensions, click the call icon.
- Check the box next to a call record and click the ‘Print’ button. This action will open a new pop-up window with the printing interface.
- Click on the ‘Email’ button to send all of the reports listed on the page or select a box next to a report and click on the ‘Email’ button to send only the selected ones.
Furthermore, provide an e-mail address where the report is to be sent and click the ‘OK’ button to proceed or ‘Cancel’ to abort the email action.
- CLIR Reports
- CLIR (Command Line Interface Record) details
(e.g. Select a desired call record and click this button to view more technical details about the call. A small pop-up window will open with the data). - NOTE: When experiencing any kind of unexplained problems, this is the data you need to send to the technical support team
- (Command Button)
CLIR report has been improved to show when the channels limit defined in the license is exceeded, the CLIR will show the exact numbers ( current > max ).
- Delete Recording
- Deletes the recorded calls. NOTE: For this command to be displayed, the record queue calls option needs to be set in the settings.
(e.g., Select a recorded call and click this button to delete it from the system)
- CSV Download
- Download data as a .csv (Comma Separated Value) file
(e.g., Click this button to download the .csv file to your desktop)
- Date Range
- Select the date range that you wish to see the CDRs for. There are a few predefined ranges you can use or freely use the Custom range per your needs.
- From
- Enter the specific caller destination that you wish to see CDRs for.
- To
- Please choose the queue from the drop-down menu that you wish to see CDRs for.
- Status
- Choose the status of the call (e.g., Answered, Unanswered, Busy or select ALL) to filter the CDRs based on the status.
- ID#
- CDRs can now be filtered by 2 different types of IDs. First is Unique ID, and by filtering with this one you get the same functionality as before (set by default).
By clicking the blue “#” sign right to the “ID” label you change the type of ID to Linked ID. Filtering CDRs with this type of ID will list all CDRs that are “linked” to the selected one and you will be able to see the call flow where the selected CDR is included.
- Additional search options (6.0 update):
-
- Show rated calls only
- (toggle button ON or OFF)
- Users can choose to have only those calls with a cost displayed in the report. If this option is not selected, then the report will feature ALL calls.

Show Rated Calls
- NOTE: The above can be done in Online Self Care as well with the same options.
- TIP: After making any changes to the search filter, be sure to click the search icon.
Settings
Queues Settings
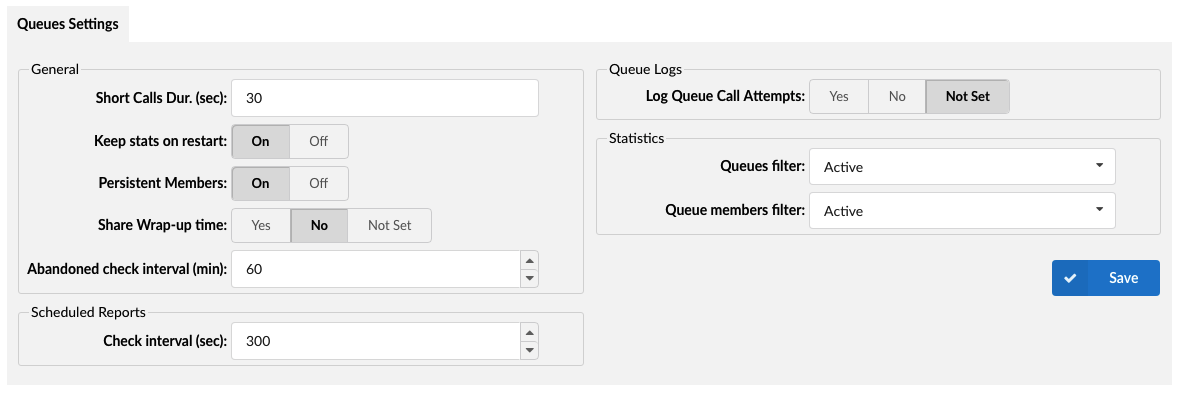
Queues Settings
General
- Short Calls Dur. (sec)
- Enter the number of seconds which means that calls should be treated as Short Calls in agents’ stats.
(E.g. 30)
([0-9])
- Keep stats on restart
- When Steadfast-UC is restarted, queue stats are reset if this option is not turned on.
(E.g. On, Off)
(Option buttons)
- Persistent Members
- In case of Steadfast-UC, restart agents will not log off.
(E.g. On, Off)
(Option buttons)
- Share Wrap-up time
- If one agent is a member of more queues, for example Q1 and Q2, and for Q1 the wrap-up time is set to 5s but in Q2 the wrap-up time is not set, by turning on this option, Q1 and Q2 will share the same wrap-up time for the common agent.
(E.g. Yes, No, Not Set)
(Option buttons)
- Abandoned check interval (min)
- How often to check for abandoned calls.
(E.g. 60)
([0-9])
Scheduled Reports
- Check interval (sec)
- How often to check for queue statistics that will be included in report.
(E.g. 300)
([0-9])
Queue Logs
- Log Queue Call Attempts:
- Whether to create a log for an attempts where queue call agents.
(E.g. Yes, No, Not Set)
(Option buttons)
Statistics
- Queues filter
- Choose Queues filter to load ALL used or currently active Queues
(E.g. Active)
(Select box)
- Queue members filter
- Choose Queues members filter to load ALL used or currently active Queues
(E.g. Active)
(Select box)


